Monday, January 13, 2014

Adventures in Flintknapping - Part 6 - Five Weeks In

With the holidays over I am now able to make some time to write a little more about my knapping progress.  At the time I started writing this article It had been about 5 weeks since I started to learn this new skill of flintknapping.  I thought I would post a picture of all of the points and preforms that have survived so far.  There are twenty three survivors in about thirty five days.

23 survivors in 35 days

Knapping is turning out to be a rewardable experience.  I am very glad I decided to try it out.  I have also had my fist experience of the outstanding community of knappers.  The photo below is of the beautiful stone that I was given by the great folks at Goknapping.com.  I would like to say thank you and I hope to be able to do the stone the justice that it deserves.

 Some really pretty Christmas stone from Goknapping.com

I am still having difficulty with the occasional break.  It seems to stem from trying to 'dig into' the piece too agressively. The last three breaks all came from the same type of miss strike where I was trying for a flake through a hump. 

Still breaking a few

I still need to get my hand strength up for better pressure flaking and learn notching.  But all in all I am fairly happy with my progress so far.

I do have to apologize for the long delay, I have been researching topics for the indoor bushcraft series.

Thursday, December 26, 2013

Bushcraft Indoors - Part 1


In this series I am going to offer and demonstrate some specific ideas and adaptations for the indoor bushcrafter. Bushcraft skills are perishable and to remain efficient with them we must practice. There are numerous reasons why we may need to practice indoors including adverse weather, injury, living arrangements and free time restrictions. While you don’t get anything approaching a true outdoor experience, the time you put in now will reduce the amount of basics you have to practice when you do get the opportunity to be outside. This will make our often limited time outdoors more productive and enjoyable.

I am going to approach this series with a brief overview first and then break out the specific topics that I have enough experience to cover in depth into further installments. Some of the sub topics may broken into further more detailed discussions.

First Aid / Safety

The most essential skill for any bushcrafter is an understanding of basic first aid. Most of the activities in the field involve using very sharp tools and things that are very hot from being in or near a fire. Small cuts and minor burns generally fall into the “when, not if” category so preparing for them is vital. Being outdoors infrequently also increases the likelihood of blisters, sprains, contact with poisonous plants, frostbite, and insect bites and stings. First aid is not limited to the realm of bushcrafting, but is a more general life skill that can be applied anywhere.

Knots and Lashings

One of the easiest, cheapest, most fundamental bushcraft skills you can learn is basic knot work. All you need to learn and practice is a piece of cordage. Knots are best initially learned and practiced in the controlled environment indoors. Learning lashing is also easy to learn inside, just add three or four round stick like objects to your cordage. Fortunately most lashing techniques scale in size very well and apply equally to the small and the large. Knot tying is inexpensive (if not free,) safe, mess free and a great place to start even for the youngest bushcrafters.

Knife and Tool Sharpening

Knife sharpening is one bushcraft skill that is often best practiced indoors. A sturdy table and chair give the needed stability for the best results. Axes and large saws can be a bit cumbersome indoors but can be sharpened perfectly safely. Even if you don’t have a dedicated bushcraft knife you can also maintain your kitchen cutlery the same way. The small amount of mess that is produced is easily manageable.

Whittling and Woodcarving

Making useful things out of natural materials like sticks and branches really is the defining nature of bushcraft. Crafting from nature is what sets the hobby apart from basic camping. Whittling just requires a sharp pocket knife and material to work with. Small dead branches and sticks can be found almost everywhere. Where materials cannot be found laying around for free you can buy raw wood dowels and blocks at hobby, craft and home improvement, and hardware stores. The minimal mess from the sawdust is fairly easy to contain and is easy to clean up.

Reading

Reading about and learning new things is essential for mastery of any skillset. The lightest most useful tool in your kit is the knowledge in your head. Knowledge cannot be swept away by the river or lost in the snow. When you combine knowledge with experience, you will gain confidence. With confidence your reliance on gear diminishes and your overall outdoor experience improves. One of the beautiful things about reading is that you can do it almost anywhere that is reasonably dry with adequate light.

Flintknapping

Making and using primitive tools can be an enjoyable pastime and a useful survival skill. I have an entire separate series dedicated to my personal flintknapping journey.

Compass use and Navigation

Learning to use a map and compass is a skill that can begin indoors. To truly put it to use you need to go outside but can be accomplished even in the most urban of environments. Maps are readily available for nearly every square inch of the planet. Learning the basics of how to read a map is a form of bookwork and is best done initially in a comfortable distraction free environment. Compasses work indoors and out as long as you avoid being near large metal appliances or very close to electrical wiring. You can also learn to orient a map from any window with a good view of surrounding landmarks.

Fire Making

While one of the most essential skills for the bushcrafter, making fire is one of the most difficult skills to safely practice indoors. The only time you should ever make a fire indoors is when you have a functional wood burning fireplace or wood burning stove. Friction fire making should only be practiced outdoors as there is a great tendency to loose control of the hearth board and scatter hot material. The best urban option for fire making is a charcoal grill in a safe location where it is allowed by local fire codes.

Conclusion

These are just a starter sample of outdoor skills that are easily learned practiced indoors. With a bit of creativity almost any bushcraft skill can be safely practiced in the urban or suburban environment. In my next installment I’ll take one of these topics and cover it in detail.


Copyright 2013. All rights Reserved. No portion of this article may be reproduced without the express permission of the author.

Monday, December 16, 2013

Adventures in Flintknapping - Part 5 - More Improvement

I wasn't able to make as much time as I would have liked to practice this week.  I still managed to make some progress.  I'm getting more accurate with percussion and worked through some blisters with pressure flaking. I did manage to make some points I'm not ashamed to show.

This one is a medium deer point.

I'm still not getting notching down quite right but I do like the asthetic that I salvaged on this one.  My primary focus is to be able to make pieces for jewelry and display but this one could be serviceable with some sharpening.  

A 'larger' preform

A so far this is a totally percussion piece preform that I had very few mis-strikes.  I'm not certain if this is a result of improving skill or aggravated tenacity.  You get a really great feeling when you take that nice palm sized rock and don't completely turn it to chips for the debitage pile.  I'm still having a bit of difficulty seeing the finished piece in the raw rock but I'm getting closer.

 A mostly full collection of my points so far

The above photo is missing a couple of points. I have one on a necklace, and one is still soaking in bleach to get the gore off from it.  I had a small hooked shard in my finger that I didn't notice for a while that was bleeding on the stone.  As I've said before; knapp for a while and you will see your own blood.  The cuts are usually very small and nearly painless but can bleed a surprising amount. While it is both unsanitary and a bit gory, the liquid impedes pressure flaking and makes it even more dangerous by sticking the tiny sharp bits in direct contact with your fingers and tools. Keep band aids and your preferred antiseptic cleaner close at hand.

 My first obsidian points

I'm not liking obsidian very much right now.  I'm having difficulty keeping it from stepping alot or developing deep gouges.  I think the adjustment will come but for now small bird points are the best I can do.  I think I need to work some glass bottles before trying obsidian much more.

 A few of the points I have been given

These are some very nice points that have been given to me by other knappers.  The two on the left came from the folks at Goknapping.com.

 Some necklaces for Christmas presents

I purchased some points to make Christmas presents.  I tried to use as many natural and somewhat period appropriate materials as possible with no plastic.  I used bone, copper or glass beads, cotton cordage, horn hair pipe and copper clasps and fittings.

Bone neck piece

I also made a bone neck piece with natural bone beads.  I did use artificial sinew and I hand carved and drilled the wooden spacer bars.  If I do another I think I would stain the spacers a dark color but I like this one as it has a more true to artifact feeling to me.

Tuesday, December 3, 2013

Gear Review - Mora #2 and The Pathfinder Sheath

For this first product review I have chosen to review the Morakniv Classic 2 more commonly known in the US as the Mora #2 and the sheath sold separately by Self Reliance Outfitters.  This is the same knife often used by many bushcrafters including Dave Canterbury and Cody Lundin.

I would like to note as a standard disclaimer that any product that I review on this blog or on youtube are products that I personally own and have used.  Unless noted as an un-boxing or first impression piece I have used the gear in some fashion to at least replicate average use in the wild.

The first item I am reviewing is the knife itself.  The knife has a 4.2 inch blade length and an overall length of 8.3 inches.  The knife has a carbon steel blade with a scandi grind. Out of the box it has a lacquered wooden handle and comes with a plastic sheath.


In my opinion the Mora #2 itself has the best value in a price per pound way of any fixed blade knife available for sale in 2013.  The one that I purchased cost $15 with free shipping.  It has a good carbon steel blade and is very sharp out of the box. Mine did come with a slight combo grind and took about an hour to re-profile into a true flat scandi grind.  On the first use I did find the handle to be a bit slippery when even slightly wet.  Beyond sharpening the first modification that I made was to sand off the lacquer, file some grooves and re-stain the handle.  This improved the grip 1000% and I personally think adds to the personality of the knife.  If you are trying to decide on one fixed blade knife to start basic bushcraft with, this is the one.

The Mora is easy to put an edge on and it is easy to keep it on.  The size of the knife is right in the goldilocks zone; not too big not too small. The knife is carbon steel so you do need to keep it clean and slightly oiled.  The stock sheath while made of plastic is fairly tough and works well with a neck carry but is not so great with a belt cary.  With a small para cord and tape modification you can very easily add a safety retainer.

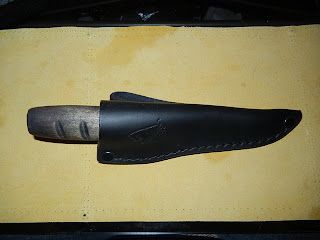
Para cord mods with a sail needle taped to the sheath compared to the leather sheath.

The next companion item I want to review and strongly recommend is the Pathfinder leather sheath sold by Self Reliance Outfitters the partner store to the Pathfinder School ran by Dave Canterbury.  For the $12 price I paid, this sheath is outstanding.  The sheath is made of thick leather and makes carrying the Mora on your belt substantially safer and more convenient.    
The leather sheath also showing the handle mods

The knife fits perfectly into the sheath with a friction grip holding it securely and allowing for easy access.

The front side of the Pathfinder Sheath displaying the Pathfinder Logo

All of the stitching is high quality, done with care and attention to detail.  The belt loop is thick and accommodates most common belts.

The back side of the Pathfinder Sheath

The Pathfinder sheath is strikingly similar to the sheath on the Condor Bushlore knife.  The Condor is another high value knife with great reviews lauding it's sheath as well that I will review in a separate article.

The front side of the Pathfinder Sheath compared to the Condor Bushlore

For both of these sheaths I would like to press some beeswax into the thread holes to add to the longevity and water proofing capability.

The back side of the Pathfinder Sheath compared to the Condor Bushlore

I would strongly recommend this knife for anyone starting out in bushcraft.  For a fixed blade knife it is not too large as to become intimidating to other hikers on a trail.  I've found that when worn in a neck sheath it is not even noticed by most people.  The knife is also a good fit in the kitchen as paring knife, meat cutting knife or as a general kitchen tool.

As with any knife check you local laws before purchase.  Some urban localities have severe restrictions on fixed blade knives.  If it is legal for you to own one the combination of a Mora #2 and a Pathfinder sheath cannot be beat on a price per pound basis.


Adventures in Flintknapping - Part 4 - Some Improvement

This is the fifth installment of my series covering my first attempts at flintknapping.  As a bit of a disclaimer I am not a professional archaeologist, paleontologist, flinknapper, historian, or geologist.  I’m just a person with an interest to both learn this difficult skill and share the learning experience with others. Hopefully this will be a help as they start their journey down this path.

In part three I was getting somewhat frustrated rather quickly.  I have to remind myself that any skill worth having is worth putting in the dirt time to acquire, and eventually master.  Even though this is a skill that 'is so easy a cave man can do it' it still takes time and patience, especially when learning without direct access to an instructor.  Time and tonnage.

For a couple of days I wasn't accomplishing much other than turning big rocks into small rocks and flying razor blades.  In times like this I like to recall the words of Thomas Edison 'I have not failed, I've just found 10,000 ways that wont work.'  I think that knapping is a skill that requires gaining the knowledge of what doesn't work along with what does.  With all of the dynamics involved you may need to hit the rocks 10,000 times with little success, but pay attention to the bad hits as much as the good.  When the piece breaks don't be completely bummed out.  Immediately look at it and ask, what did I do that caused this to happen?  While it may be a undesired outcome this time, and may be undesired most of the time, there may come the time when it is the desired outcome.  Remembering what went wrong and why always adds to your mental toolkit for the day that it may actually be needed.

I started today by trying to pressure flake again.  My previous attempts were mostly unfruitful.  This time I was using a proper hand pad.  The results were dramatic.  I still can't push 'long flakes' but I am pushing reliably predictable flakes.  I started with one of the preforms I had at hand.


I still need some more work on slowing down and choosing my platforms better but I was feeling much more confident.  I was feeling confident enough to pick up one of the larger flakes that I was saving until I had enough skill to work with it.  I analysed the piece letting it tell me where the point was on the inside.  The flake had some problems; it had a bulb of percussion on one end, a large ridge on one side and a slight twist overall.  With my renewed confidence and a better grasp of pressure flaking I started to let the point out of the rock.


After about only an hour I had my best work yet.  Not perfect by any means but serviceable and a far shot better than anything else I've done.  

I worked this piece entirely abo, cracked the bone and  small antler while notching

Ruler for scale, I still have to work on symmetry

I just couldn't get that ridge off, without messing it up


The main lessons learned today are that proper support of the work piece means a world of difference, and to not give in to frustration.  Other lessons are that abo pressure tools grab at the small sharp edges better than copper but dull or break more quickly.  I still need to work on envisioning the whole finished point at every step.

Anyone who is reading this I thank you for your time and I hope that I've been helpful.  See you in the next installment.

Monday, December 2, 2013

Adventures in Flintknapping - Part 3 - Learning the frustration

This is the fourth installment of my series covering my first attempts at flintknapping.  As a bit of a disclaimer I am not a professional archaeologist, paleontologist, flinknapper, historian, or geologist.  I’m just a person with an interest to both learn this difficult skill and share the learning experience with others. Hopefully this will be a help as they start their journey down this path.

In this part I continue through my first week of learning to knapp.  In part two I covered my first day with proper tools and stone.  

This episode can be summed up with an old military/bushcraft saying that I'm fond of; 

‘Embrace the Suck.’  

What that means is that even though whatever you are going through right now may feel lousy, you will make it through and you will be better off for it once it is over and you are past it.  It makes many of those crumby situations much more bearable if you recognize them for what they are and acknowledge them appropriately.

On the first day there was chaos; on the second there was pain.  I had not fully realized exactly how many times I had missed the stone and hit my leg until the following morning.  My upper thigh looked like I had taken a hit from a baseball.   It wasn’t a serious kind of pain by any means but I definitely did not want to learn bad habits by working through and around an injury even this mild.  So, day two evolved into a book/video study day while the swelling went down.

On day three I was feeling up to trying again.  I had decided to calm down and be a bit less heavy handed today.  I chose some obsidian, some dacite and another hunk of the raw Texas chert.  Instead of working one for any length of time I would rotate and try to keep from getting too heavy handed.  That strategy seemed to work for a while.

After a while of settling in on a rhythm of find the platform, abrade and look for flaws, then accurately hit the platform, I was starting to purposely remove flakes with better than chance reliability.  I was starting to get the hang of it.  There are so many factors in play for any given strike that it is near impossible to cover them all in words, pictures, or video.  The angle of the stone, the arc of the swing, the power of the swing, and the quality of the platform are all three dimensional variables that go into every swing of the billet.  Things were going rather well for a while and I was getting a nice biface shape on two preforms,

and then; crack.

No worries, lets work the other piece.

Nice shape on raw stone and then 'snick'

Clean in two

This is getting a bit frustrating.

Along with all of the variables mentioned above there is also how to hold the rock, where to brace it, and how firm to brace it.   Knowing when to stop being aggressive in flake removal and knowing how a particular stone reacts when thin are also factors that cannot be easily shown.  When the rock is in your hand you will be face to face with all of these factors at the same time.


While occasionally frustrating knapping is definitely proving to be a hobby that is well worth the time investment.  It has some great Zen qualities to it that are hard to describe.

Adventures in Flintknapping Part 2 - Tools and Stone Arive

I was very excited the day my order from goknapping.com arrived.  The box was packed perfectly and everything arrived in excellent condition, including a beautiful completed point scotch taped to my receipt. I could hardly wait to get home and start making chips.

Once I was settled in at home I started to set up.  I put my drop cloth on the floor under the chair turned the fan on towards the open window, and donned my safety glasses and gloves.  I chose a variety of rocks from my collection.  I grabbed the gnarly knobby raw Texas that I had tried with the hammer, along with some Novaculite and Dacite from the kit.  I was ready to knapp.

I wanted to at least test out all of the tools once.  I had purchased a selection of both aboriginal and modern tools.  I started with the modern ones.

In the above photo I am showing my now slightly abused copper bopper, copper tipped pressure flaker, and modern abrader.

I started with the nice brown Texas rock from ebay.  I chose the copper bopper as my implement of destruction.  I carefully examined the rock for a good platform (proper place to hit the rock,) made a few practice swings and then missed completely hitting my leg.  Fortunately I had several layers of protective padding.  After a few more swings I started making more regular and somewhat more accurate contact but I was getting very few controlled flakes.  I also realized that I was swinging the bopper very much harder than I have seen in most videos.  After getting a bit frustrated with this rock I switched over to some of the white Novaculite.  Using the same force and angle I had just learned from half an hour on the raw "root beer" Texas; OG SMASH! I learned that Novaculite has entirely different properties from the raw Texas chert.  The same force that would barely dent the raw stone rendered the heat treated rock into dust.  Lesson learned in one small explosion of chunks and dust.

During this first marathon session I did also try out some of my abo tools.


In the photo above I am showing an antler billet, two antler pressure flakers and a sandstone abrader.

Over the next couple of hours I did manage to make a couple of small pre forms (worked pieces that are ready for further refinement) and what I will call my first point.  I also was lucky and broke of a nice opportunistic flake that is in the shape of a claw with a nice finger grip.  Despite the numerous layers of padding and other safety gear I still managed to make a large bruise on my leg, cut my hand in two places and get grit into the corner of my eye.

My First three 'points' and some attempts at pressure flaking

Two preforms and my first 'point'

This hammer stone did not hold up to the tough root beer Texas chert.  Root beer is tough stuff.

Mounted the first one for posterity.

'The Claw' A rather nice opportunistic flake. The bottom edge is razor sharp.


The main lessons that I learned first hand today:

Different rocks have very different properties, and even different parts of the same rock can behave differently.

Knapping is a hand eye coordination muscle memory skill similar to playing an instrument or archery.  Treat it like that kind of skill and when you get tired stop; you will learn bad habits when physically tired.  The best guitar instruction I ever received was being told to simply play for 15 minuets EVERY day for a month.  At the end of the month I could practice for two to three hours without getting tired, and then real learning could begin.

Knapping can be spectacularly frustrating.  Watching hours of videos really does not prepare you for the fist time holding the rock.  Most of the knappers that are making videos are very good.  They make a hard skill look very easy and simple.  There are very few videos of beginners making turtle backs and breaking preforms in half.  What I've been able to gather from videos and books, is that it takes the average person about a year and a lot of material to get 'good.'  I have heard the phrase, Time and tonnage, many times.